�m���ɡnOSPF (Open Shortest Path First) �m���ɡnOSPF (Open Shortest Path First) |       |
*OSPF is available on platforms with an Advanced Edge or Core license.
OSPF��Link State Protocol�ALink�O��router�V�~�s���������A��State�O����router�������S�ʤΩM��۾Frouter�������Y�A
�䤤�̭��n���A�N�O��� router �����Z���C
�bOSPF���Arouter���i�H���۶ǰe��T�����A
�C��router�b�����F������T����A�N�i�H�إ߰_�ۤv���u�����a�ϡv(Routing Table)�A�i�Ӫ��D�n�����Ӥ�V���~��o�F�ت��a�C
��router�����Z���ڭ̥i��Metric (��Cost)�Ӷq�סA��Metric���w�q�p�U�A

�]�N�O���A�W�e�V�j���u����Metric�V�p�A�i�����Z���V��C
�h��ت����q�ɡA�Y���h�����ѥi��A�]�|�]Metric�����P�A�Ӧbrouting�W���ۥ��ᶶ�Ǫ����P�C
�۸���RIP�º�Hhop conut�ӭp��A�B�C�����|����W�L15��router������A
OSPF���۸��������p��B�㦳���j�u�ʡA�i�A�Ω�j�������C
�ӳo�@��Ӥj�������i�H�⥦�ݦ��@��domain�A�]�N�OOSPF���������۪v�t��(Autonomous System)�C
���b���j�����۪v�t�Τ��A��p�⪺�t�|�]�n�洫���T���L�h�A�ɭP���ĤӺC�C
���ѨM�����D�AOSPF�ĥ�hierarchical(�h�Ŧ�)�������[�c�A
���̷Ӻ����������ϰ�ʡA�N���������X�Ӹ��p��Area�A�bArea����router�|�洫����������T���A
�Ӧh��Area�����A�ĥ�summarization(�K�n)���覡�ӥ洫��T�C
Area������router�s��IR(Internal Router)�A
�Ӧ�b�ϰ������ɡA�t�d�P�䥦�ϰ�����洫�K�n�T����router�s��ABR(Area Border Router)�C
�bOSPF���w�q���AArea�S�����H�U�X�ؤ��P�����C
- Backbone Area���F�ϰ�
�bOSPF�������A�u�n���j��@�Ӫ�Area�A�N���ݦ��@��Backbone Area�A�C�@��Area��ABR�ϰ�洫�䥦�ϰ쪺�K�n�C
�bXOS���W�d�W�ABackbone Area�w�]�N�s�b�A�B�L�k�Q�R���έק�FBackbone Area�Q�w�q��Area 0.0.0.0�C
- Stub Area���y�ϰ�
Stub Area�O�@�س̥��ݪ��ϰ�A�u�M�@��Area�s��(Backbone Area)�C
�~�������ѰT���L�k�ǤJ��Stub Area�A�ΥH���router���귽���ӡC
�إ�Stub Area�����O�p�U�C
create ospf area <area-identifier>
configure ospf area <area-identifier> stub [summary | nosummary] stub-default-cost <cost>
- Not-So-Stubby-Areas�����y�ϰ�
�����y�ϰ�y�ϰ�������A�W�[�F�H�U��O�A
�]�A�~�����ѰT���i�H�ǤJ���ϰ�A�o�쪺�~�����ѰT���i�A�ǻ����䥦�ϰ�(�]�tBackbone Area)�C
�إ�NSSA�����O�p�U�C
create ospf area <area-identifier>
configure ospf area <area-identifier> nssa [summary | nosummary] stub-default-cost <cost> {translate}
- Normal Area�@��ϰ�
�DBackbone Area�BStub Area��NSSA���ϰ�C
�إ�Normal Area�����O�p�U�C(���N�O���A�[�Wstub/nssa���Ѽ�)
create ospf area <area-identifier>
�b�[�cOSPF�ɡA�i�̥H�U9�ӨB�J�Ӷi��C
- Attach the physical connections.
- Create the VLANS.
- Configure the VLAN IP address
- Add ports, tagged or untagged.
- Enable IP Forwarding.
- Configure the RouterID for each router. (Recommended)
configure ospf routerid [automatic | <router-identifier>] �Y�ĥ�automatic�A�hswitch�W�̤j��IP address�|�Q���Ӱ���router-identifier�ϥΡC
- Create OSPF Areas as required.
(Area 0.0.0.0 is already pre-configured on the switch.)
create ospf area <area-identifier>
configure ospf area <area-identifier> {Parameter}
- Configure the VLANs for OSPF and associate them with the correct area.
configure ospf add vlan [all | <VLAN-Name>] area <area-identifier> {link-type [Auto | Broadcast | Point-to-point | Passive]}
- Enable OSPF globally on the switch.
enable ospf
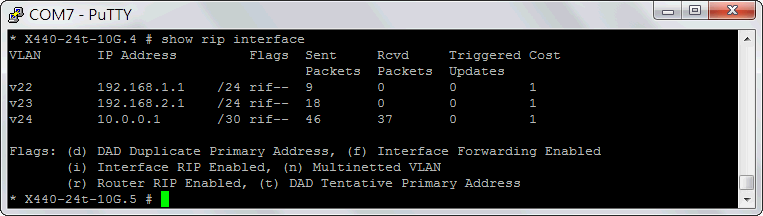
�ڭ̦^�L�Y�Ӭݬ�Area�PVLAN����link-type�Cconfigure ospf add vlan [all | <VLAN-Name>] area <area-identifier> {link-type [Auto | Broadcast | Point-to-point | Passive]}
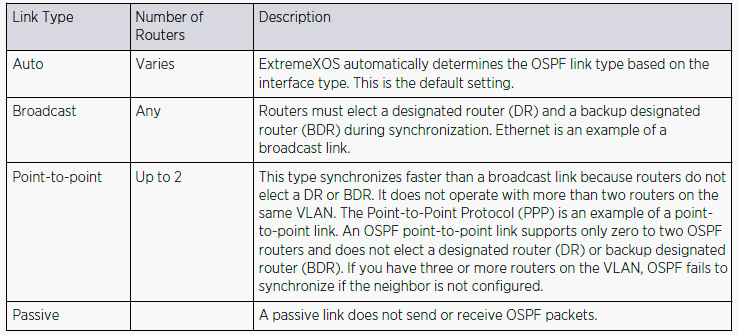
������n�S�O�Ӭ�link-type�H
���O�]��Advanced Edge license�U��router�u�䴩4��active OSPF VLAN interface (neighbor)�F
���Y�Opassive interface�A�h�S������C
�ҥHAdvanced Edge license��router�i�z�L Passive ���覡�ӳ]�w����VLAN�n�[�JOSPF�A�ӭ��ǤS���n�F
�o�˥i�H���֦���OSPF neighbor���ƶq�C
�Y�n�ק�OSPF�洫�T�����U�خɶ��ѼơA�i�ΥH�U���O�C(�D�зǪ��]�w�|�v�TOSPF���i�a�ʡA�Ф��H�N�ק�I)
configure ospf area <area-identifier> timer <retransmit-interval> <transit-delay> <hello-interval> <dead-interval> {<wait-timer-interval>}
configure ospf virtual-link <router-identifier> <area-identifier> timer <retransmit-interval> <transitdelay> <hello-interval> <dead-interval>
configure ospf vlan [<vlan-name> | all] timer <retransmit-interval> <transit-delay> <hello-interval> <dead-interval> {<wait-timer-interval>}
retransmit-interval�w�]�ȬO5��
transit-delay�w�]�ȬO1��
hello-interval�w�]�ȬO10��
dead-interval�w�]�ȬO40��
wait-timer-interval�S���w�]�ȡC�Y�n�]�w�A�ݤj��hello-interval�C
��RIP�@�ˡAOSPF�]�i�H�N�䥦���������ѾɤJOSPF�A����O�p�U�C
enable ospf export [bgp | direct | e-bgp | i-bgp | rip | static | isis | isis-level-1 | isis-level-1-external | isis-level-2 | isis-level-2-external] [cost <cost> type [ase-type-1 | ase-type-2] {tag <number>} | <policy-map>]
����N�䥦���������ѾɤJOSPF�A����O�p�U�C
disable ospf export [bgp | direct | e-bgp | i-bgp | rip | static | isis | isis-level-1| isis-level-1-external | isis-level-2 | isis-level-2-external]
�d��OSPF Area�t�m�A����O�p�U�C
show ospf area {detail | <area-identifier>}
�d��OSPF Interface�t�m�A����O�p�U�C
show ospf interfaces {vlan <vlan-name> | area <area-identifier> | enabled}
�d��link-state database�A����O�p�U�C
show ospf lsdb {detail | stats} {area [<area-identifier> | all]} {{lstype} [<lstype> | all]} {lsid <lsidaddress>{<lsid-mask>}} {routerid <routerid-address> {<routerid-mask>}} {interface[[<ipaddress>{<ip-mask>} | <ipNetmask>] | vlan <vlan-name>]}
�ѦҸ��
���Ѩ�w�κ����[�c��R
How to Configure OSPF Extreme Network Switch

♥���l�ѱC������A�Цh���ӡ�
If you don't like something, change it.
If you can't change it, change your attitude.
Don't complain!
|


 2015-08-07, 10:46