Shunze 學園 >資訊設備專區 >Extreme & Enterasys > 《分享》Extreme Summit Switch的基本設定 哈囉,還沒有註冊或者登入。請你[註冊|登入]
« 上一篇主題 下一篇主題 » 顯示成列印模式 | 增加到我的最愛
發表新主題 發表回覆
作者
主題
shunze
工友伯伯


註冊日期: 2002 04
來自: 潮汐終止之地
文章: 2380

shunze 離線
《分享》Extreme Summit Switch的基本設定引用回覆 編輯/刪除文章 搜尋由  發表的其他文章 回報給版主 IP 位置 回此頁最上方

Extreme Summit Switch預設帳號Admin、User,預設帳號並沒有設置密碼;
其中Admin為管理員權限,User為一般權限。
(Extreme Switch支援的密碼長度最小需四個字元最大支援到十二個字元)

Extreme Switch的OS為XOS,
CLI在操作時,無大小寫的差別,Switch都可以接受;
未完成的指令按下tab鍵,可顯示所有可能對應的指令。

另外Extreme Switch跟一般Switch有一個比較不同的概念 - Virtual Router。
系統預設有VR-Default與VR-Mgmt兩個Virutal Router,
其中管理用的網路介面(網路孔上有標Management)屬於VR-Mgmt,
而一般網路介面屬於VR-Default。


帳號管理
變更密碼

#configure account <Account>


建立帳號時,需具備Admin權限。(Switch 能支援最多到 16 個管理帳號)
#create account [admin | user] <Account>

看要給建立的帳號admin或user權限

查看帳號
#show accounts


刪除帳號
#delete account <Account>


網路IP管理
設定IP Address
#configure vlan <Vlan-Name> ipaddress <IP>/<subnet_mask>
#configure vlan "Default" ipaddress 192.168.20.200 255.255.255.0
#configure vlan "Default" ipaddress 192.168.20.200/24


刪除IP Address
#unconfigure vlan <Vlan-Name> ipaddress
#unconfigure vlan "Default" ipaddress


檢視IP Address
#show ipconfig


設定一般路由
#configure iproute add <Destination-network> <Destination-mask> <Gateway-IP>
#configure iproute add 192.168.10.0 255.255.255.0 192.168.20.1
#configure iproute add 192.168.10.0/24 192.168.20.1


設定default路由
#configure iproute add default <Gateway-IP>
#configure iproute add default 192.168.20.1


刪除路由
#configure iproute delete <Destination-network> <Destination-mask> <Gateway-IP>
#configure iproute delete 192.168.10.0 255.255.255.0 192.168.20.1
#configure iproute delete 192.168.10.0/24 192.168.20.1


檢視路由
#show iproute


設定DNS
#configure dns-client add domain-suffix xyz_inc.com
#configure dns-client add name-server <DNS-IP>


刪除DNS
#configure dns-client delete domain-suffix xyz_inc.com
#configure dns-client delete name-server <DNS-IP>


Port管理
啟用Port
#enable ports <Port>


停用port
#disable ports <Port>


查看port資訊
#show ports {Port} information
不指定Port時,顯示所有port


查看port流量統計
#show ports {Port} statistics


按U上一頁,按D下一頁,按0清除計數器

查看port即時流量
#show ports {Port} utilization


按U上一頁,按D下一頁,按tab鍵切換顯示單位


VLAN管理
建立VLAN
#create vlan <Vlan-Name>
#configure vlan <Vlan-Name> tag <Vlan-ID>


刪除VLAN
#delete vlan <vlan-Name>


將Port加到VLAN中
#configure vlan <Vlan-Name> add ports <Port>
#configure vlan "default" add port 9


設定Port帶VLAN tag (Trunk Mode)
#configure vlan <Vlan-Name> add ports <Port> tag
#configure vlan "default" add ports 9 tag


將Port自VLAN中刪除
#configure vlan <Vlan-Name> deletes port <Port>
#configure vlan "default" deletes port 9


配置VLAN的L3 IP Address
#configure vlan "default" ipaddress 192.168.1.254/24


啟用L3路由功能
#enable ipforwarding


查看VLAN
#show vlan


要查看VLAN下有哪些Port成員,要用detail
#show vlan detail


系統管理
顯示Switch資訊
#show switch


顯示firmware資訊
#show version


變更Switch名稱
#configure snmp sysName <Host-Name>


查看執行過的指令
#history


查看log
#show log


條列Switch檔案
#ls


編輯檔案
#vi <File-Name>


複製檔案
#cp <Source File-Name> <Destination File-Name>


刪除檔案
#rm <File-Name>


透過tftp備份檔案
#tftp put <TFTP-Server-IP> vr "VR-Default" <File-Name>


透過tftp下載檔案
#tftp get <TFTP-Server-IP> vr "VR-Default" <File-Name>


儲存設定
#save

變更過設定,提示符號會多一個 * 號。
輸入save儲存後,* 號就會消失代表設定已寫入primary.cfg。


另存組態檔。
#save configuration {primary | secondary | <existing-config> | <new-config>}

若未輸入檔名,則會取代預設的primary.cfg設定檔;
若自行輸入檔名,系統會再詢問是否要將此檔案做為開機預設的組態檔。
儲存組態檔時,不用加副檔名,糸統會自行加上副檔名 cfg。

載入組態檔。
#use configruation <config-filename>

載入既有的組態檔會在重開機後生效,組態檔不用加副檔名 cfg。

查看運行中組態
#show configuration <Module>


重開機
#reboot


清空設定值
#unconfigure switch all

unconfigure switch all 這個指令會清空所有設定值,並重新開機,不過使用者密碼並不會隨著重設。
當重開機後,若偵測到有default.xsf這個檔案,它會優先讀取;若沒有這個檔案,則回復最初的出廠值。
利用這個特性,我們可以事先在default.xsf寫入所需要的設定值,並利用tftp上傳到Switch內。
一旦這台Switch發生異常時,可以下unconfigure switch all,並讓它自動抓取 default.xsf ,
以後就不用再做任何設定,簡單又方便。只要硬體沒問題,永保不死身。

reboot這個重開機指令,不會去抓default.xsf;只有unconfigure switch all才會去抓。
參考資料 http://mike7120.blogspot.tw/2012/09/extr...ult-config.html


忘記密碼如何恢復到出廠預設值?
請參考這一篇 “XOS如何恢復出廠預設值”。


校時
在出狀況時,正確的時間設定有助於系統管理員於log中找到問題,
其重要性不可忽略!

XOS上時區與offset的設定指令如下,其中offset單位是分。
#configure timezone name <tz_name> <GMT_offset>

例如台北時區是+8小時,換算為480分,其設定如下。
#configure timezone name Taipei 480


至於與NTP伺服器校時,可用sntp (Simple Network Time Protocol),於固定週期內向NTP Server校時。
#enable sntp-client
#configure sntp-client update-interval 1200
#configure sntp-client [primary | secondary] <NTP_Server_IP>


若為封閉環境,且無NTP Server,可下達以下指令直接設定時間。
#configure time <month> <day> <year> <hour> <minute> <second>


而查看系統時間、時區,沒有特殊指令,需透過show switch來查看。
#show switch


Web管理
Extreme Swtich也支援透過web來進行管理,不過預設是停用的。
要啟用web管理,請先設定好管理IP,然後下達以下指令來開放http或https管理頁面。
#enable web http | https


不過就像其它家的Switch一樣,在web下能做的設定有限。


♥順子老婆的網拍,請多關照∼

If you don't like something, change it.
If you can't change it, change your attitude.
Don't complain!


2014-11-12, 15:38 shunze 的個人資料 把 shunze 加入好友列表 發送Email給 shunze 瀏覽 shunze 的網站 MSN : shunze@gmail.com
shunze
工友伯伯


註冊日期: 2002 04
來自: 潮汐終止之地
文章: 2380

shunze 離線
《分享》Summit Switch的堆疊設定引用回覆 編輯/刪除文章 搜尋由  發表的其他文章 回報給版主 IP 位置 回此頁最上方

Summit Switch在做堆疊時,一台Switch會採用兩條堆疊線,向上向下構成環狀堆疊。
環狀堆疊有其特有的備援機制,當堆疊中的任一Switch故障時,不會影響其它堆疊架構中的Switch運作。


堆疊組態建立與查詢
第一次做堆疊時,在串好堆疊線後,可下達以下指令來自動建立堆疊組態。
*注意,執行此指令後,原Switch的設定會被清空!

#configure stacking easy-setup


查詢堆疊組態,有以下4個指令來查詢相關資訊。
#show stacking


#show stacking configuration


#show stacking detail


#show stacking stack-ports


堆疊組態取消/啟用
欲消取堆疊,可用以下指令,重開機後才會發生效果。
#disable stacking

重開機後,堆疊組態消失。

啟用堆疊,指令如下,重開機後才會發生效果。
#enable stacking

重開機後,只有執行指令的switch變為stack switch,slot編號為1;
其餘switch要逐一自行啟用stack,並自行建立slot編號。

設定堆疊網卡號碼。
#configure stacking mac-address

建立堆疊組態的網卡號碼。
採自動建立網卡號碼,無法自行手動設定,重開機後發生效果。
適用於disable stacking後,堆疊組態的重新建立時,重新產生Slot網卡號碼。


堆疊組態Slot編號調整
自動建立堆疊編號。
#configure stacking slot-number automatic

自動建立堆疊編號,重開機發生效果。

依Switch的網卡號碼來指定堆疊編號,重開機後發生效果。
#configure stacking node-address <Node_MAC_Address> slot-number <Slot_Number>

因為重開機後才會發生效果,所以重新排列slot順序時,可直接設定新slot號碼,不需要進行跳號來避免衝突。

堆疊後Switch的Port標示法 <Slot>:<Port>
例如第一台Switch的第5 port標示為 1:5。


管理IP alternate-ip-address設定
設定管理用VLAN的IP位址 configure stacking alternate-ip-address。
預設的管理VLAN其名稱為Mgmt,對應之Virtual Route為VR-Mgmt,實際的網路孔為標示 Management 的網路孔。
設定 alternate-ip-address 時,需依網卡號碼或Slot編號來對switch個別設定。
#configure stacking node-address <Node_MAC_Address> alternate-ip-address <IP_Address/Mask> <Gateway_IP>
#configure stacking slot <Slot_Number> alternate-ip-address <IP_Address/Mask> <Gateway_IP>


清除堆疊Switch的 alternate-ip-address。
#unconfigure stacking alternate-ip-address

沒有其它參數,下達指令後,會清除所有堆疊swtich的 alternate-ip-address。


啟用Alternative Stack Ports
在Extreme switch中除了以外接板卡的方式來提供堆疊專用的port外,
也支援透過10G SFP+ port來進行堆疊(通常是最後兩port)。

這種專供堆疊使用的擴充port,叫做native stacking port;
而可傳輸data,也可用來堆疊的port則叫alternate stacking ports。
查詢switch上stack port的配置可用以下指令。
show stacking-support

在大多數的summit model中,要讓alternate stacking ports能夠進行堆疊,需下達以下指令。
#enable stacking-support


↑最後兩port (25,26)為alternate stacking ports,預設stacking-support狀態是Disabled,無法以進行堆疊。


↑啟用stacking-support後,狀態變為Enabled。重開機後,即可使用alternate stacking ports進行堆疊。

要停用堆疊功能,讓alternate stacking ports恢復為一般data port,請下達以下指令。
#disable stacking-support


♥順子老婆的網拍,請多關照∼

If you don't like something, change it.
If you can't change it, change your attitude.
Don't complain!


2014-11-28, 12:06 shunze 的個人資料 把 shunze 加入好友列表 發送Email給 shunze 瀏覽 shunze 的網站 MSN : shunze@gmail.com
shunze
工友伯伯


註冊日期: 2002 04
來自: 潮汐終止之地
文章: 2380

shunze 離線
《分享》Extreme Summit Switch的進階設定引用回覆 編輯/刪除文章 搜尋由  發表的其他文章 回報給版主 IP 位置 回此頁最上方

Load-Sharing Group
將多port合併為一個group,以達到failover及load sharing效果。
Extreme最大支援16 port組成一個Group。

#enable sharing <Port> grouping <Port-List> {LACP}

其中選用參數LACP為sharing group的組成協定。若未指定,預設為static。
與其它廠牌對接時,建議採用標準的 LACP (Link Aggregation Control Protocol)。
例如,將1,2,3,4 port組成一個LACP Group,指令如下。
#enable sharing 1 grouping 1,2,3,4 LACP


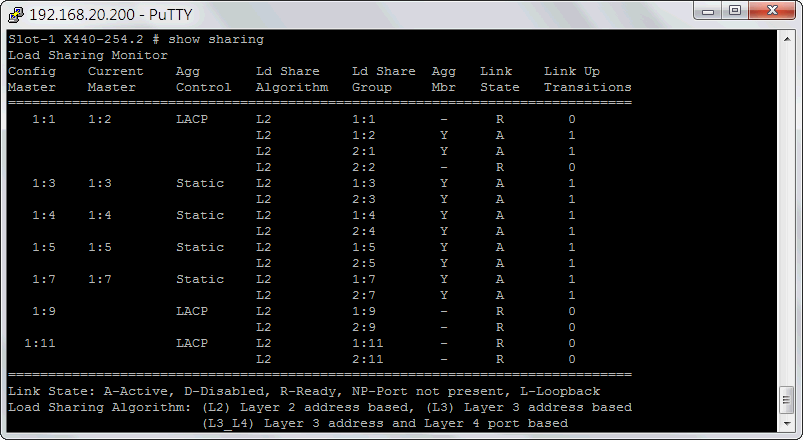
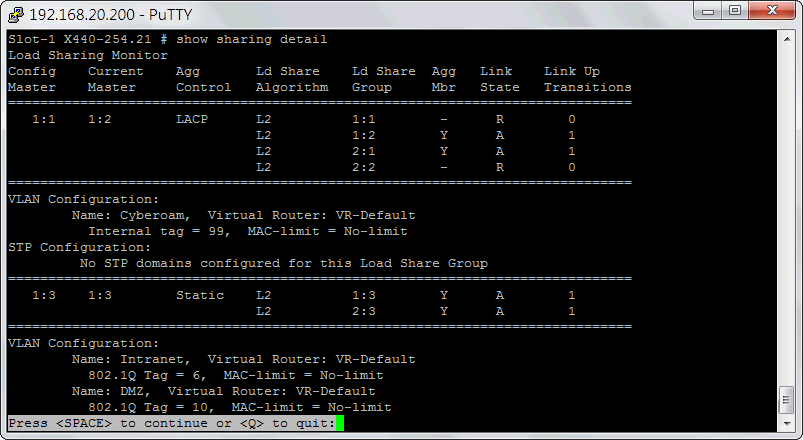
檢視Load-Sharing有以下幾個相關指令。
#show sharing


#show sharing detail


若檢視LACP相關資訊,則可下以下指令。
#show lacp
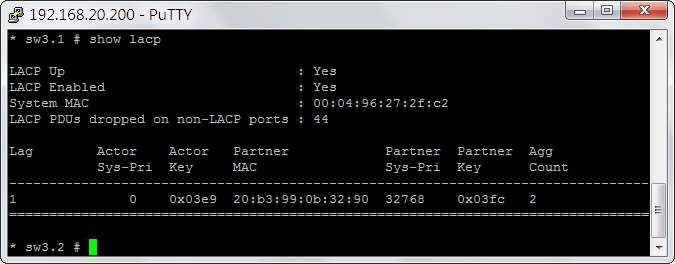

其中Actor指的是Extreme Switch自己,Partner指的是對接的另一頭Switch;
Sys-Pri指的是System Priority,Key指的是LACP的admin key,而Agg Count指的是群組成員數。
若是static group,其群組資訊不會出現在這喔!


增加Load-Sharing Group成員指令如下。
#configure sharing <Port> add ports <Port-List>


刪除Load-Sharing Group成員指令如下。
#configure sharing <Port> delete ports <Port-List>


取消Load-Sharing Group指令如下。
#disable sharing <Port>

注意!若要變更sharing模式由LACP→Static,或是由Static→LACP,
只能取消原有sharing,再建立新的sharing模式。


Mirror鏡像配置
XOS上的Mirror組態有其使用限制,同一時間只支援 4 組Mirror instances的啟用,
其中ingress方向最多4組,egress方向最多2組,總合不得超過4組。

設定Mirror組態時,請先設定組態名稱與用來接收鏡像流量的port或多組port。
enable mirror {Mirror-Name} to [port <Port> | port-list <Port-List>]

其中若Mirror-Name不輸入的話,則使用預設的組態名稱 DefaultMirror
目的port一經設定即失去VLAN屬性,亦即不具網路效果,純粹只能接收流量副本封包,
對接的流量主機需透過另一張網卡才能提供正常的網路存取。

接著再設定鏡像來源port或vlan,這樣Mirror的設定就完成囉∼
config mirror {Mirror-Name} add port <Port-List> {ingress}
config mirror {Mirror-Name} add vlan <VLAN-NAME> {ingress}

其中若不輸入可選性參數ingress,表示ingress/egress兩個方向都要收;
這樣等於佔用了兩組instances喔!

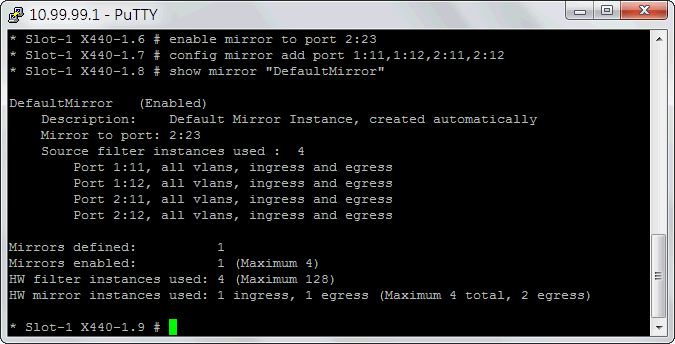
例如,將1:11,1:12,2:11,2:12四個port的流量都副本一份到Port 2:23,其指令如下。
enable mirror to port 2:23
config mirror add port 1:11,1:12,2:11,2:12


若要刪除Mirror組態,其指令如下。
disable mirror {Mirror-Name}


檢視Mirror組態配置指令如下。
show mirror {Mirror-Name}


Spanning Tree Protocol
Exteme同樣支援了Rapid Spanning Tree Protocol (RSTP)與Multiple Spanning Tree Protocol (MSTP)。
系統預設有一個包含全部port,名為 s0 的STP內建在其中,不過 s0 預設是停用的,若有需有可直接修改STP的模式,然後再啟用它。

以下為STP的手動建立方式。

建立STP
#create stpd <STPD-Name>
#create stpd S1


設定封裝協定
#configure stpd <STPD-Name> default-encapsulation dot1d
#configure stpd "S1" default-encapsulation dot1d


設定STP模式
#configure stpd <STPD-Name> mode <STPD-Mode>
#configure stpd "S1" mode dot1w

支援了以下三種標準STP模式
dot1d 802.1D STP
dot1w 802.1W RSTP (Rapid Spanning Tree Protocol)
mstp 802.1S MSTP (Multiple Spanning Tree Protocol)


設定STP套用的VLAN與Port
#configure stpd <STPD-Name> add vlan <VLAN-Name> ports <Port-List>
#configure stpd "S1" add vlan "default" ports all

*注意!Trunk Port不能加入STPD。

啟用STP
#enable stpd <STPD-Name>
#enable stpd S1


刪除STP
#delete stpd <STPD-Name>


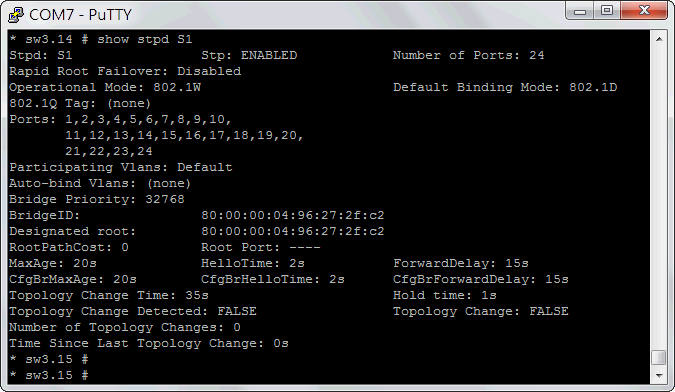
檢視STP
#show stpd <STPD-Name>


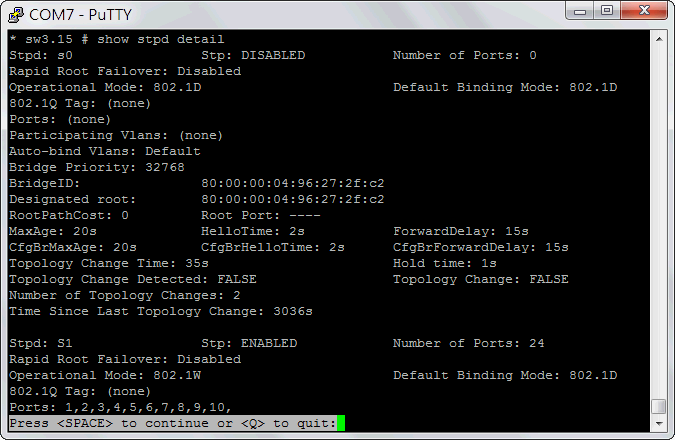
#show stpd detail


#show stpd <STPD-Name> ports
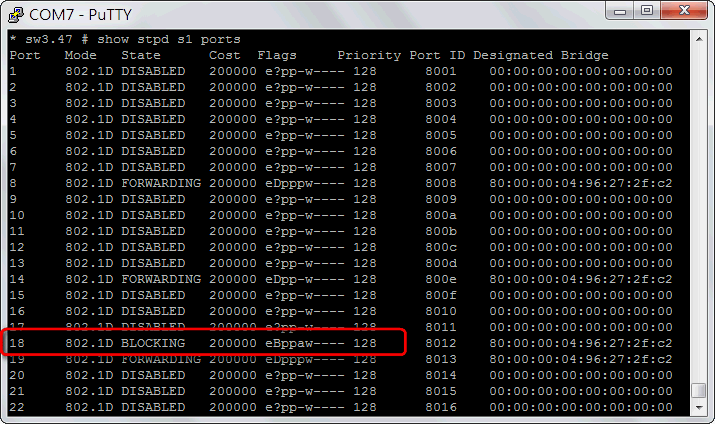

↑被STP偵測到而封鎖的port會顯示 BLOCKING 喔∼


迴圈防護機制ELRP
Extreme XOS的迴圈防護機制為ELRP(Extreme Loop Recovery Protocol)。
此機制是由Switch以一次性或週期性封包來進行測試,若於某port上又收到此封包的回傳,意謂著這port有loop,
XOS將對此port進行週期性或永久性的封鎖。

ELRP在部署上是以VLAN為base,也就是說不同的VLAN要各自套用ELRP的偵測防護。
ELRP在設定上相當簡捷,首先啟用ELRP,指令如下。
#enable elrp-client

週期性發出封包偵測,其指令如下。
#configure elrp-client periodic <vlan-Name> ports <Ports-String> interval <Interval-Times> [log | trap| log-and-trap] disable-port [permanent | duration <Duration Time>]

以每5秒對VLAN Defalut進行偵測,偵測到loop封鎖該Port 2分鐘為範例,其指令如下。
#configure elrp-client periodic "Default" ports all interval 5 log-and-trap disable-port duration 120

若要取消設定或變更偵測內容,需先解除該VLAN的ELRP設定,指令如下。
#unconfigure elrp-client <vlan-Name>


要查看ELRP設定,其指令如下。
#show elrp
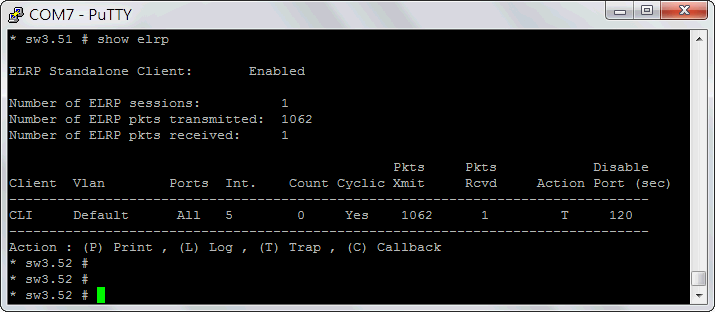


要查看哪一port被ELRP偵測到迴圈而block,可用以下指令查看。
#show elrp disable-ports
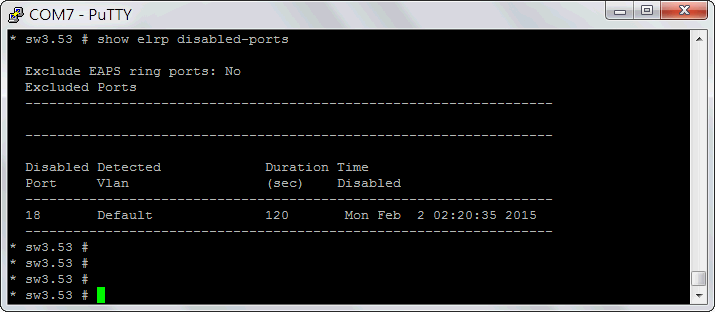

↑範例中第18 port因迴圈而被封鎖2分鐘。


DHCP Server設定
DHCP Server的架設自然包含了配發的IP區段、配發時間、Default Gateway及DNS等基本設定。
#configure vlan <VLAN-NAME> dhcp-address-range <Start-IP> - <End-IP>
#configure vlan <VLAN-NAME> dhcp-lease-timer <Times>
#configure vlan <VLAN-NAME> dhcp-options default-gateway <Gatewary-IP>
#configure vlan <VLAN-NAME> dhcp-options dns-server <Primary-DNS-IP>
#configure vlan <VLAN-NAME> dhcp-options dns-server secondary <Secondary-DNS-IP>
#enable dhcp ports <Port-List> vlan <VLAN-NAME>

比較特別的是哪些port與vlan要進行DHCP的配發?
全在一個 enable dhcp port 指令中就搞定了,簡捷有力!

假設我們要對Default VLAN所屬的2到10 port配發DHCP,
配發IP範圍從192.168.1.101到192.168.1.200,配發有效週期一天,
Default Gateway為192.168.1.254,DNS為192.168.1.1及192.168.1.2,
那麼我們可以進行如下的設定。
#configure vlan "Default" dhcp-address-range 192.168.1.101 - 192.168.1.200
#configure vlan "Default" dhcp-lease-timer 86400
#configure vlan "Default" dhcp-options default-gateway 192.168.1.254
#configure vlan "Default" dhcp-options dns-server 192.168.1.1
#configure vlan "Default" dhcp-options dns-server secondary 192.168.1.2
#enable dhcp ports 2-10 vlan "Default"


不過鎖定MAC號碼來配發靜態IP這個功能目前還不支援。
那什麼時候會支援?也許等Extreme想通了,就會把這功能加上去...


檢視DHCP的配發狀況
#show dhcp-server <VLAN-Name>
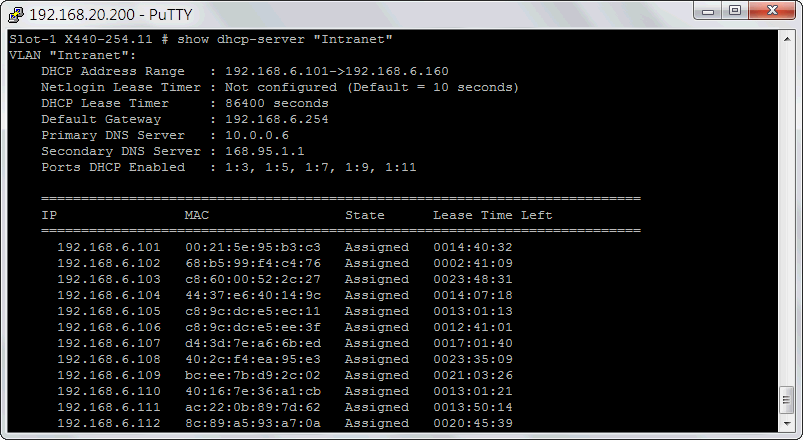


DHCP snooping防護功能
要在網路中防堵私有自架的DHCP Server,避免干擾正常的DHCP配發,
可透過enable dhcp-snooping功能來進行,指令如下。
#enable ip-security dhcp-snooping <VLAN-Name> ports <Port-List> violation-action drop-packet {FUNCTION}
其中 FUNCTION 提供了對應的封鎖功能,包含了鎖MAC、鎖Port及封鎖時間的選擇,參數如下
{[block-mac | block-port] [duration <duration_in_seconds> | permanently] | none]}


例如在Default VLAN中將違規發放DHCP封包的Port封鎖10分鐘,我們可以進行以下指令。
#enable ip-security dhcp-snooping "Default" ports all violation-action drop-packet block-port duration 600


另外在下達 dhcp-snooping 指令時要注意,綁定成一個Group的Ports是不能列Port List中,
在設定時要將Group port排除在清單之中!


而相對的,要指定某台DHCP Server IP可以合法的配發DHCP,可使用以下指令。
#configure trusted-servers <VLAN-Name> add server <Server-IP> trust-for dhcp-server


若要開放某些Port可以合法配發DHCP,則可使用以下指令。
#configure trusted-ports <Port-List> trust-for dhcp-server


要檢視DHCP snooping組態,則可使用以下指令。
#show ip-security dhcp-snooping <VLAN-Name>
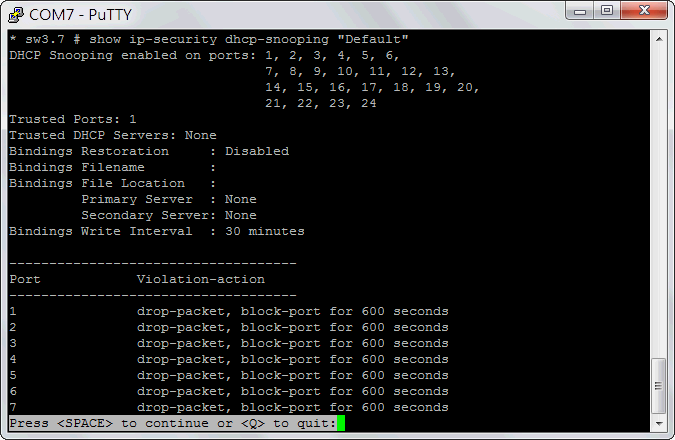


查看哪些Port因亂發DHCP封包而被封鎖可以下指令。
#show ip-security dhcp-snooping violations <VLAN-Name>
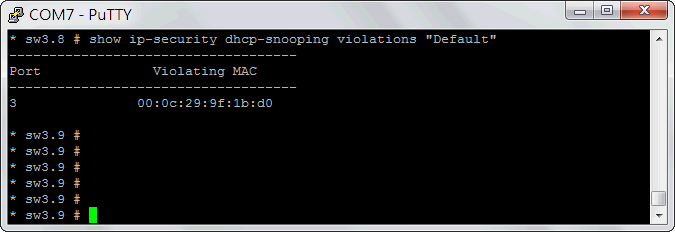


♥順子老婆的網拍,請多關照∼

If you don't like something, change it.
If you can't change it, change your attitude.
Don't complain!


2014-11-29, 10:35 shunze 的個人資料 把 shunze 加入好友列表 發送Email給 shunze 瀏覽 shunze 的網站 MSN : shunze@gmail.com
shunze
工友伯伯


註冊日期: 2002 04
來自: 潮汐終止之地
文章: 2380

shunze 離線
《分享》Access Control List (ACL)引用回覆 編輯/刪除文章 搜尋由  發表的其他文章 回報給版主 IP 位置 回此頁最上方

在設定使用ACL之前,我們必需先瞭解Extreme ACL的設定方式。

首先,我們必需建立ACL的規則,
這個部分包括來源/目的地IP網段、Protocol/Port與允許/拒絕等基本項目;
然後再針對要套用規則的介面或VLAN引用此規則。

另外Extreme的ACL支援了檔案式的ACL及指令式的Dynamic ACL,
功能雖然一樣,但在編輯及介面套用上略有不同,使用時請區分清楚。


建置ACL
建立ACL的指令如下。

create access-list <ACL-Name> <Conditions> [permit | deny] {non_permanent}

例如,我們要拒絕來源網段192.168.0.0/24透過UDP 53連到168.95.1.1這個IP,我們可以下達以下指令。
create access-list Deny_UDP_53_HiNet "source-address 192.168.0.0/24;destination-address 168.95.1.1/32;protocol udp;destination-port 53;" deny

若我們要阻擋ping,則可下達以下指令。
create access-list ICMP-ECHO "protocol icmp;icmp-type echo-request" deny


在ACL的建置上,Extreme提供了一個滿彈性的作法,可透過文書編輯器 vi 來進行編輯,然後將檔案儲存為副檔名 pol 的檔案。
例如上例,我們可以分別建立兩個檔案 Deny_UDP_53_HiNet.pol 與 ICMP-ECHO.pol 來使用,其效果相同。
vi Deny_UDP_53_HiNet.pol
entry Deny_UDP_53_HiNet {
    if {
        source-address 192.168.0.0/24;
        destination-address 168.95.1.1/32;
        protocol udp;
        source-port 1 - 65535;
        destination-port 53;
    } then {
        deny;
        count C1;
    }
}

vi ICMP-ECHO.pol
entry ICMP-ECHO {
    if {
        protocol icmp;
        icmp-type echo-request;
    } then {
        deny;
        count C2;
    }
}

其中 count 為計數器,可計算每一個ACL被使用的次數。

若以上兩個 pol 會套用在同一介面上,我們還可以將兩段ACL寫在同一檔案之中。
vi Deny_UDP_53_HiNet.pol
entry Deny_UDP_53_HiNet {
    if {
        source-address 192.168.0.0/24;
        destination-address 168.95.1.1/32;
        protocol udp;
        destination-port 53;
    } then {
        deny;
        count C1;
    }
}

entry ICMP-ECHO {
    if {
        protocol icmp;
        icmp-type echo-request;
    } then {
        deny;
        count C2;
    }
}

編輯完成的 pol 檔案,我們可以透過以下指令來檢查語法內容是否正確(不用加副檔名pol)。
check policy Deny_UDP_53_HiNet

檔案式的ACL與指令式的ACL,雖然作用完全相同,但在Extreme的概念上卻有著些微的差異。
指令式的ACL叫做 Dynamic ACL,可以插在其它ACL之前或後,也可以當作位置的參考點,讓其它Dynamic ACL插入;
檔案式的ACL 則不行如此!


套用ACL到介面
套用上述建立的 檔案式ACL 套用到指定的介面或VLAN的指令如下。
configure access-list <ACL-Name> [ any | ports port_list | vlan vlan_name ] {ingress | egress}

其中 ingress | egress 是指流進或流出介面的方向,預設是ingress。

以上例來說,我們要將 Deny_UDP_53_HiNet 套用到Port 17,我們可下達以下指令。
configure access-list Deny_UDP_53_HiNet port 17


而指令式的 Dynamic ACL 要套用到介面或VLAN其指令如下。
configure access-list add <ACL-Name> [[first | last] | [before | after] rule] [ any | vlan vlan_name | ports port_list ] {ingress | egress}

*注意!檔案式的ACL,無法使用此方法插入在既有ACL之前或後;
也無法被其它Dynamic ACL做為參考點,插在前面或後面。


例如我們要在第17 port加上另一筆ACL ICMP-ECHO,並且排在最前面,我們可下達以下指令。
configure access-list add ICMP-ECHO first port 17


清除介面上的ACL
若我們要清除介面上的 檔案式的ACL,可用以下指令。
unconfigure access-list <ACL-Name> {any | ports port_list | vlan vlan_name} {ingress | egress}

例如清掉第17 port上的 Deny_UDP_53_HiNet ACL指令如下。
unconfigure access-list Deny_UDP_53_HiNet port 17


而移除 Dynamic ACL 的指令如下。
configure access-list delete <ACL-Name> [ any | vlan vlan_name | ports port_list | all] {ingress | egress}

configure access-list delete ICMP-ECHO ports 17


刪除ACL
刪除 Dynamic ACL 指令如下。
delete access-list <ACL-Name>

刪除前要清空所有套用此ACL的介面設定,不然會出現ACL被套用而無法刪除的錯誤訊息。

而檔案式的ACL,只要把檔案刪除即可,沒有特別的刪除指令。


計數器Counter管理
查看ACL計數器count指令如下。
show access-list counter {countername} {any | ports port_list | vlan vlan_name} {ingress | egress}


清除ACL計數器count指令如下。
clear access-list {dynamic} counter {countername} {any | ports port_list | vlan vlan_name} {ingress | egress}


查看ACL
查看檔案式ACL使用狀況的指令如下。
show access-list


查看系統中Dynamic ACL清單的指令如下。
show access-list dynamic


查看Dynamic ACL的語法內容指令如下。
show access-list dynamic rule <ACL-Name>


查看引用Dynamic ACL的介面的指令如下。
show access-list dynamic rule <ACL-Name> detail


查看介面上所引用的ACL清單指令如下。
show access-list ports <Port_List>


杳看ACL組態指令如下。
show access-list configuration


♥順子老婆的網拍,請多關照∼

If you don't like something, change it.
If you can't change it, change your attitude.
Don't complain!


2014-12-16, 10:26 shunze 的個人資料 把 shunze 加入好友列表 發送Email給 shunze 瀏覽 shunze 的網站 MSN : shunze@gmail.com
  « 上一篇主題 下一篇主題 »
發表新主題 發表回覆
跳到:

Powered by: Burning Board 1.1.1 2001 WoltLab GbR